The Guided Setup Wizard
This guide walks you through the setup wizard that creates your first AI agents. Follow the steps in order. Most of the time goes on answering the questions about your business; the AI drafting step (Step 5) may take a few minutes.
Getting Started
There are two ways to start the setup wizard:
- Click Set Up AI Agents in the top menu bar, then New. This menu also lists your earlier setups.
- Click the Set Up AI Agent button next to New on the AI Agents list. This takes you straight into a new setup.
The setup is titled with your company name and today's date.
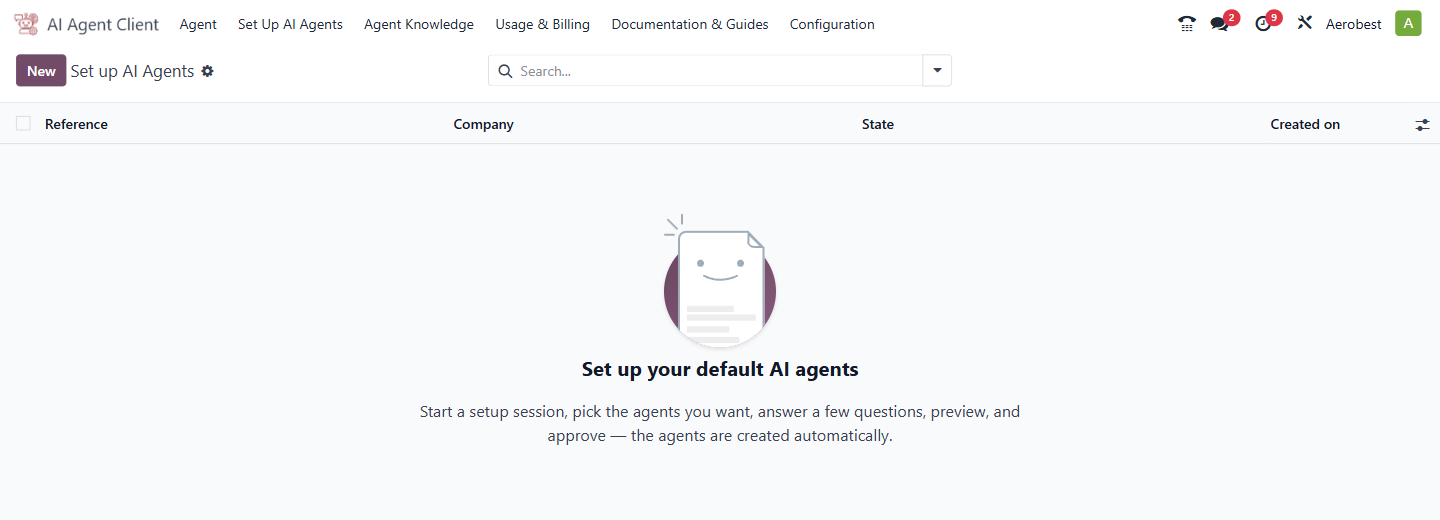
The wizard has six numbered tabs across the top, which you work through from left to right:
- Select Agents
- Company Profile
- Answer Questions
- Documents
- Company Context (AI)
- Preview
A seventh tab, Provisioned Agents, fills in once your agents are created.
The status pipeline in the top right tracks your overall progress: Draft → Company Profile → Drafting → Review → Done. You don't need to manage this — it advances automatically as you complete steps.
Step 1 — Select Agents
Choose which ready-made agents you want to set up. Tick one or more:
- HR Assistant — for leave, policy, benefits, and day-to-day HR questions.
- Sales Assistant — for sales-related queries, pipeline, and CRM.
- Support Assistant — helps your support team with helpdesk tickets, FAQs and escalations.
- Company Assistant — a general-purpose assistant for your company.
You can select as many as you need. Each agent you tick will get its own set of questions in Step 3.
After ticking your agents, click the Generate Questions button. This creates the tailored questions for Steps 2 and 3 based on which agents you selected.
⚠ You must click Generate Questions before moving to the next tab. The Company Profile and Answer Questions tabs are empty until you do.
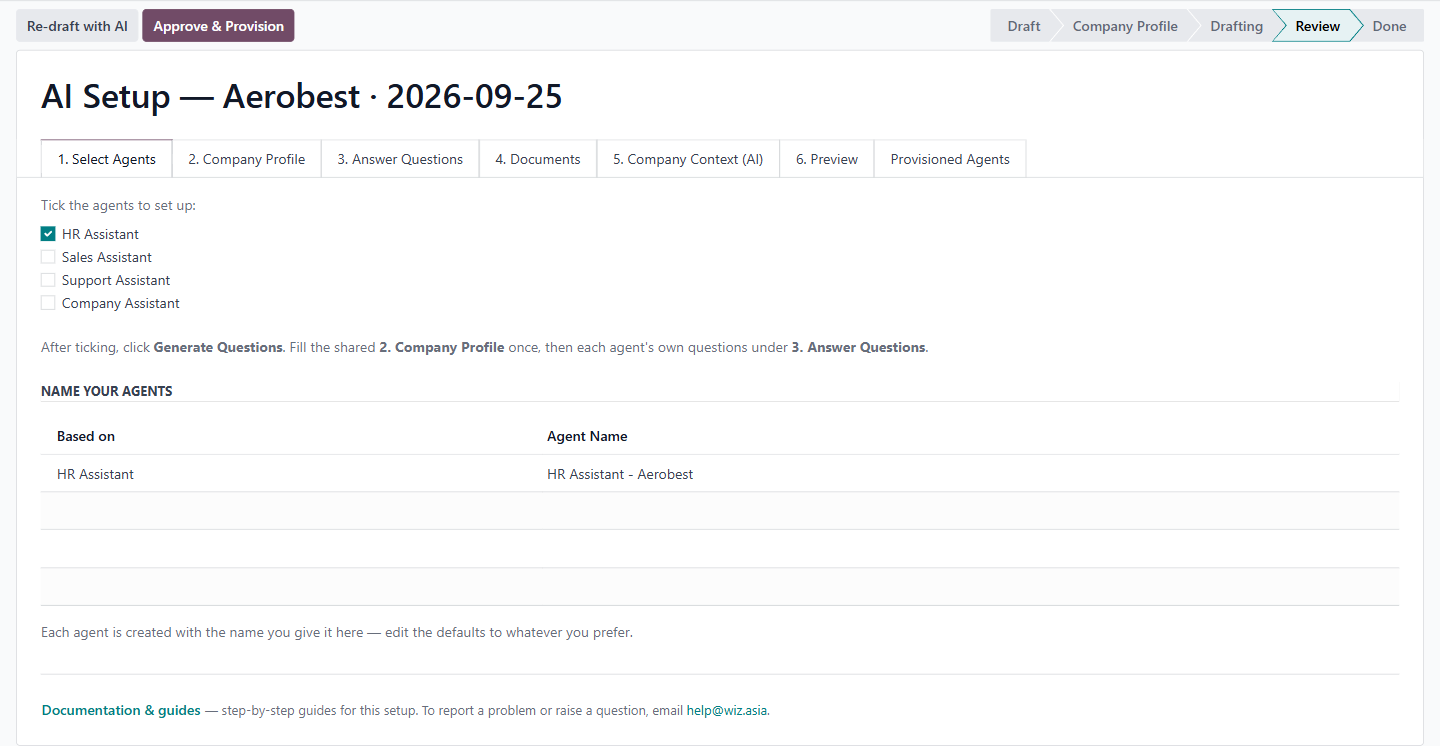
Name Your Agents: After clicking Generate Questions, a Name Your Agents section appears below the checkboxes. A table shows which template each agent is based on and a pre-filled name you can edit.
Re-running the wizard for an existing agent: If an agent of the same type has already been set up for this company, a blue note says so. Re-running the wizard for the same agent type updates the existing agent rather than creating a second one. It rebuilds that agent's instructions from the template and your new answers, so edits made on its Agent Instructions tab are replaced. A name you gave the agent by hand is kept.
Step 2 — Company Profile
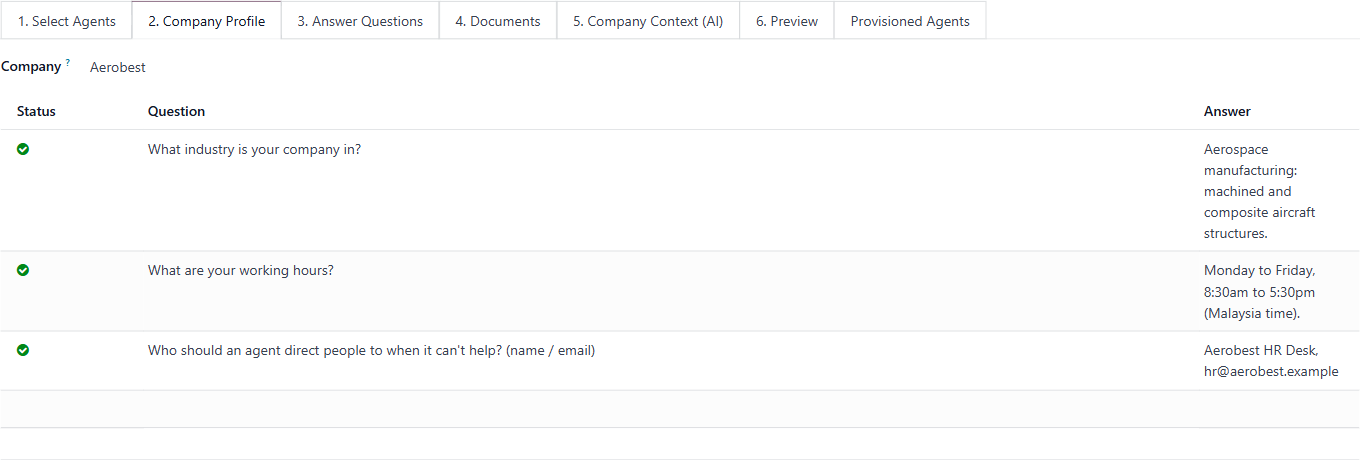
These are shared questions about your company that apply to every agent you selected. You answer them once — every agent shares these answers.
The table has three columns: Status (a green tick when answered, an amber exclamation mark when a required question is still blank, a grey dash when an optional one is), Question, and Answer. The questions are straightforward company facts — such as your industry, your working hours and who to escalate to.
Answer all of them. Short, factual answers work best — the agents use these to speak accurately about your business.
Step 3 — Answer Questions
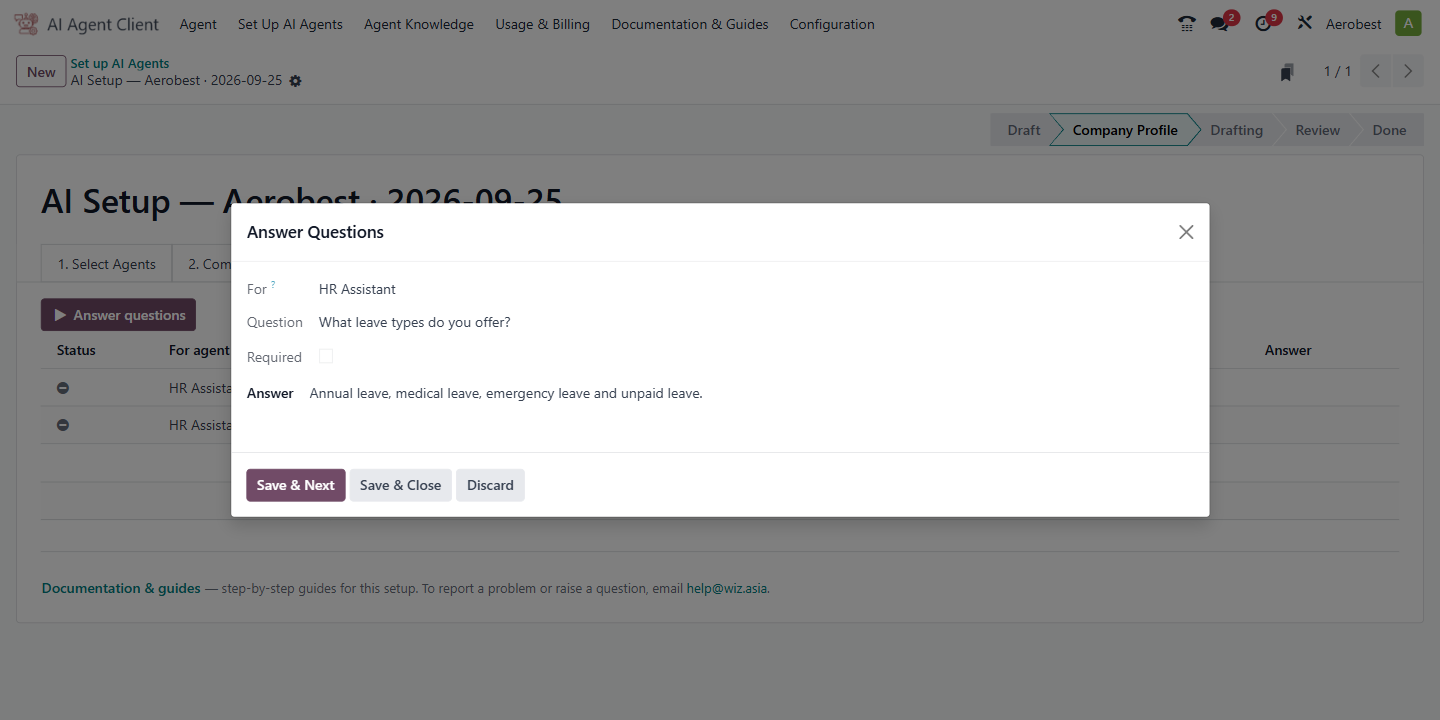
Each agent now has its own questions, specific to its role. The table shows Status, which agent the question belongs to, the Question text, and your Answer.
Click any question to answer it, or click the Answer questions button to start at the first unanswered one. Either way a window opens with three buttons: Save & Next, Save & Close, and Discard.
Step 4 — Documents
Attach company documents that your agents should be able to quote from — SOPs, policies, catalogues, or any reference material.
⚠ Only PDF files can be indexed. Word, PowerPoint, Excel, and image files upload without an error and appear in the Odoo Documents app, but they are not attached to the agent — the agent will not quote from them. The confirmation message after uploading lists what was skipped and why. If you need to attach a non-PDF file, convert it to PDF first.
Click Add / Upload Documents to either upload files from your computer or pick files already in your Odoo Documents app.
Each document then gets a row under Which agent is each document for? Set Goes to to Every agent (company-wide), or to Only the agents I choose and pick them. Approve & Provision will not run until every document has a target.
This step is optional. You can skip it now and add documents later from each agent's Documents tab. However, documents attached here are included when the AI drafts your company context in Step 5, so attaching them now produces a better draft.
ℹ Documents attached here do more than give facts to quote. The AI uses them for your company-context draft and distils each one into the instructions of the agents it is for, and on approval they are added to those agents' knowledge. Documents added later, from an agent's Documents tab, only give it facts to quote.
Step 5 — Company Context (AI)
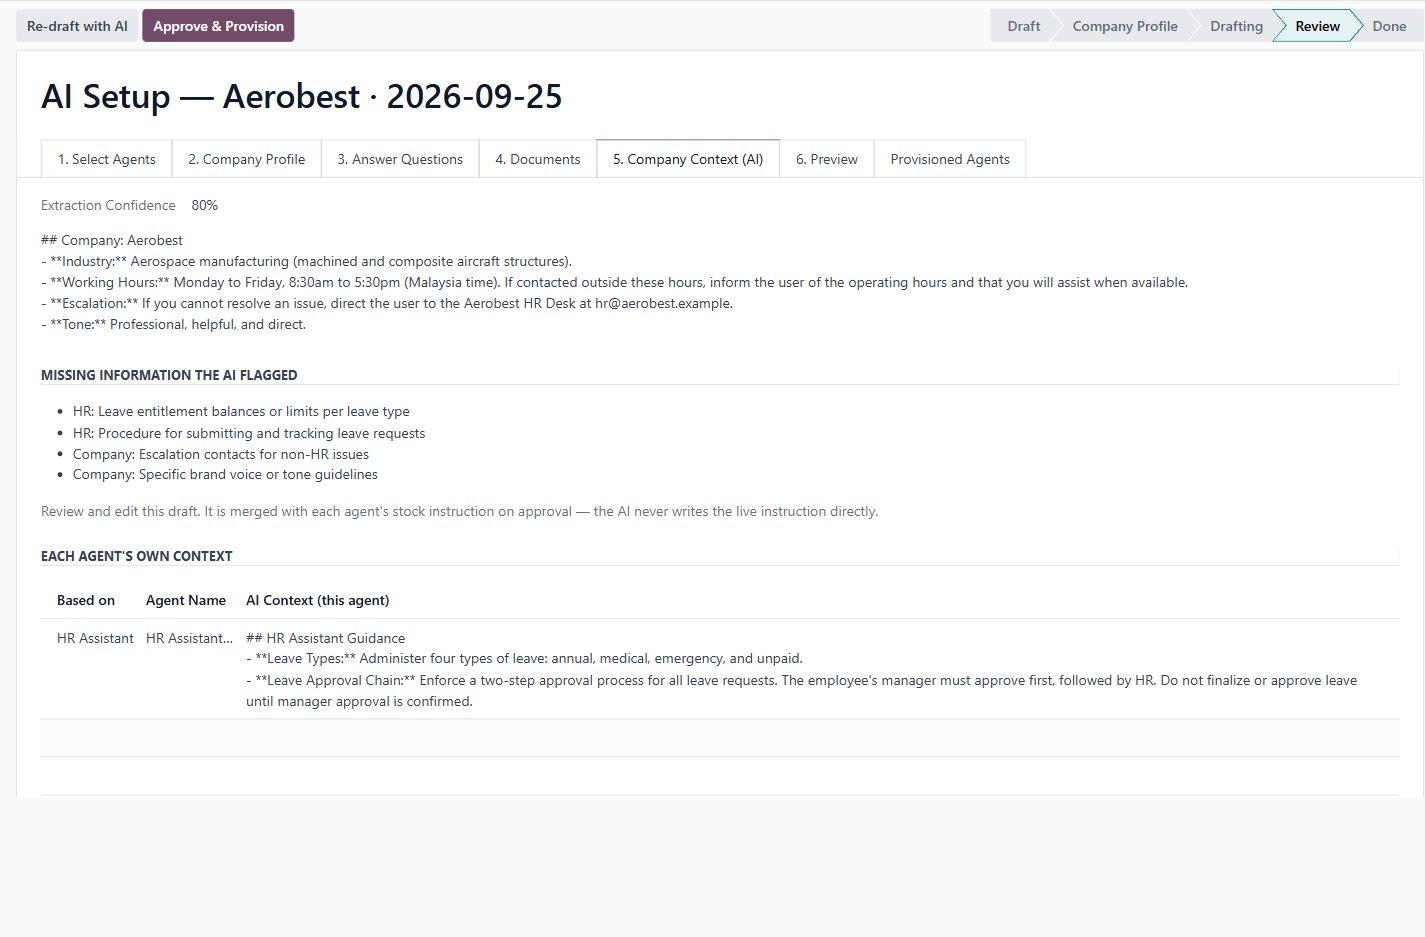
This is where the AI puts everything together. After you have answered the questions and (optionally) attached documents, the AI distils them into a concise company-context draft.
Click the Draft with AI button at the top left to generate the draft. The AI reads your answers from Steps 2 and 3, plus any documents from Step 4, and writes a summary for each agent.
ℹ The AI never writes an agent's live instruction directly. The draft is always reviewed and approved by you before it reaches any agent.
The draft text appears in an editable field. Review it, edit anything that isn't right, and move to Step 6.
Step 6 — Preview
The Preview tab shows you exactly what each agent will receive before you commit. For each agent, you can see the template it is based on, its full name, and the complete context text.
Read this carefully. This is the last step before provisioning. If anything looks wrong, go back to the relevant tab and correct it.
Below the context, a section called What Each Agent Will Be Able to Do in Odoo shows the default permissions that will be given to each agent. These are baseline defaults — you can fine-tune them on the agent's Agent Access Rights tab after provisioning.
Approve and Provision
When you are satisfied with the preview, click the Approve & Provision button at the top left. This is the action that actually creates your live agents.
After provisioning, the Provisioned Agents tab shows the agents that were created, their template, approval state ("Live"), and a reference ID. You can also click Add Documents next to any provisioned agent to attach additional documents immediately.
Your New Agent on the AI Agents List
Back on the AI Agents list, your new agent appears with Approval State: Live and AI Status: Live.
Troubleshooting
Company Profile and Answer Questions tabs are empty: You haven't clicked Generate Questions on Step 1. Go back to the Select Agents tab, tick at least one agent, and click Generate Questions.
The AI draft timed out: Your work is not lost. The status shows "Failed"; click Re-draft with AI at the top of the setup to try again.
Status shows "Failed": The AI draft or the creation of an agent did not complete. Your answers and documents are saved. If the draft failed, click Re-draft with AI; if an agent could not be created, click Approve & Provision again. If it fails repeatedly, contact help@wiz.asia.
Agent shows "Setting up" on the list and doesn't change to "Live": This appears after an agent's instructions change, for example when you re-run the wizard, while its updated instructions are prepared. This normally takes 1–2 minutes. If it takes longer, Odoo stops waiting within the hour: the status returns to "Live" and a note on the agent says its instructions could not be prepared, so it keeps answering from its previous ones. Edit and save the instructions to try again, or email help@wiz.asia.
You want to change an agent's answers after provisioning: The wizard answers are baked into the agent at provision time. To change instructions after provisioning, open the agent from the AI Agents list and edit the Agent Instructions tab directly, or re-run the wizard for that agent type with new answers, which rebuilds its instructions and replaces edits made on that tab.
You want to add more agents after completing the wizard: You can run the wizard again from Set Up AI Agents to create additional agents, or click New on the AI Agents list to create one manually.